
-
Recent Posts
- Why More Travelers Are Choosing Villas For Portugal Holidays June 28, 2026
- SWE Celebrates LGBTQ+ STEM Professionals This Pride Month June 26, 2026
- Embark on Your Leadership Journey With SWE’s Ignite Leadership Program June 26, 2026
- NATURIUM Niacinamide Cleansing Gelee Review June 25, 2026
- The AI Paradox: How AI Could Widen — or Close — Gender Gaps June 22, 2026
- Garnier Ideal Bronze Sun Cream Milk-In Spray SPF50 Review June 21, 2026
- Vita Liberata The Express Spritz Tinted Lasting Tan Review June 20, 2026
- Celebrating International Women in Engineering Day With SWE June 19, 2026
- Camille Rose Curlaide Moisture Butter Review June 18, 2026
- MERIT Clean Volume Volumizing Tubing Mascara Preview June 18, 2026
- Best Exfoliators for 2026 – all Skin Types & Budgets June 17, 2026
- Why More Shoppers Are Falling in Love with Vintage Jewelry June 16, 2026
- More Than One Community: How SWE’s Community Partners Connect You Across STEM June 16, 2026
- SWE Co-Organizes Women Scientists Forum at GTF 2026 in Shanghai June 16, 2026
- Steps Every Homeowner Should Take To Prevent Flood Damage June 16, 2026
- Money Saving Family Travel Tips That Actually Work June 15, 2026
- IT Cosmetics Do It All Sheer Face Tint Balm Review June 15, 2026
- What You Need To Know Before Buying A Freestanding Bathtub June 12, 2026
- What Sally Ride’s Film Taught Me About Success in STEM June 12, 2026
- Amika The Wizard Review June 12, 2026
- Rebuilding an Engineering Career With SWE June 12, 2026
- Simple Affordable Ways to Give Your Kitchen a Fresh Look June 11, 2026
- SWE Research Division Celebrates a Decade of Service to the Engineering Community June 11, 2026
- Omorovicza Acid Milk Review June 11, 2026
- Shape the Future of SWE by Serving on the Nominating Directorate June 11, 2026
- Best Beauty Products for Long Haul Flights 2026 June 10, 2026
- How to Capture the Little Moments From Your Wedding Day June 9, 2026
- RoC Hydra+ Hyaluronic Serum Stick Review – New Summer Skincare Essential? June 9, 2026
- Amika HydroRush Shampoo & Mask Review June 8, 2026
- CeraVe Makeup Removing Cleanser Balm Review. Is It Worth Buying? June 8, 2026
Categories
Advent Calendars All make up beauty beauty look beauty news beauty products beauty reviews Beauty Tips Best Blog Cosmetics eyes face For fragrance get Hair health home How IFTTT Ingredient Spotlight lashes lifestyle lips make-up makeup Makeup Products NATURAL HAIR photos Product Reviews Product Reviews & DIY Beauty Review Reviews sarahfynn Skin Skin Care skincare The To tutorials videos With your YoutubeLinks
Beauty Bites: How to Foil Pigments
Hello Makeup Geeks and welcome to BEAUTY BITES! This is a new series full of quick tips to help you get out the door and on your way. Each video will focus on a different product that will help you on days you are in a rush but still want to look your best. 🙂
Today we are going to focus on how to foil your eye shadow or pigments. Foiling is basically using your products wet so that the outcome is a metallic or wet-like finish. This technique is so easy to do and hives a stunning look to your makeup.
Foiling
For this I am going to be using Makeup Geek’s Insomnia pigment. It’s a stunning chocolate brown / blue duochrome that is intensely pigmented and very beautiful. You will need a few things to create this striking look:
- Eyeshadow or Pigment – Makeup Geek’s Insomnia- (Makeup Geek Store)
- Mixing Medium – Contact Solution, MAC Fix Plus Spray , FACEatelier Transforming Gel – (Makeup Geek Store)
- Pigment Lid or Flat Surface to Mix On
- Flat Stiff Brush
Simply take a small amount of your pigment and place in the lid, add a couple of drops of contact solution or other mixing medium to the pigment and mix until you have a kind of paint consistency. Use the brush to pat over the lower lid or wherever you would like to place it. This intensifies the color and makes it much more vibrant and eye-catching. It’s great for a night out at the club or when ever you want to create an intense and fun look. I recommend you use pigments as it’s much easier, but if you want to use an eye shadow, simply use the end of your brush and scrap a small amount out into your lid. DO NOT spray or apply your mixing medium directly to the eye shadow as this can actually ruin the entire pan of shadow. We also recommend you DO NOT use water as it will evaporate and can leave you with a chalky mess.
Please check out my tutorial on “How to Use Pigments“. This will give you some great ways to incorporate pigments into your look including foiling. So have some fun with your makeup and try this technique for yourself. Be sure and check back next week for another Beauty Bites.
As always, I hope you all are happy and healthy!
XOXO,
Marlena
Thanks to Makeup G
See you on next post
A Handbag for the Organised: The L.K.Bennett Pearl
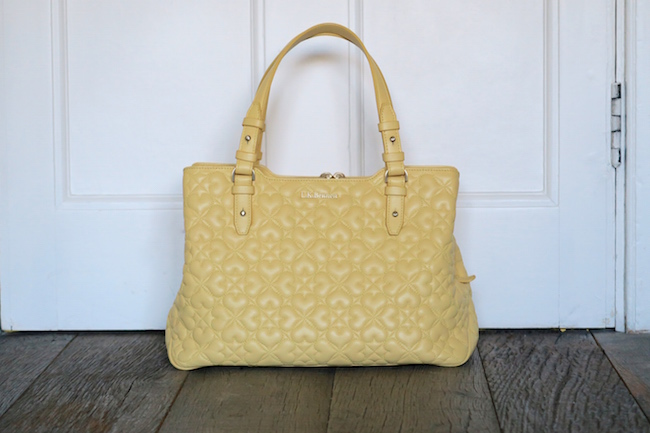
You know you are truly in love with a bag when you open up your photo stream and there are over thirty separate pictures of it! I did laugh when I scrolled through my recent photographs to find L.K.Bennett’s Pearl tote “posed” in various locations; Pearl Tote with Watering Can, Pearl Tote on Wooden Floor, Pearl Tote on the Woodpile…

Seriously though, this is one very lovely handbag – the pastel yellow leather is spot-on for a summer tote and the heart-shaped quilting is just beautiful. Both ladylike and cute at the same time – smart enough for work but gorgeous to wear with low-key jeans-and-a-t-shirt at the weekends.

There are different organiser sections inside, which are invaluable for those who like to carry around lots of notebooks and bits of paper and pens and so on. The whole thing feels very secure, with a roomy central zipped pocket and flatter pockets on either side that are perfect for keeping papers flat or storing an iPad or Kindle. I managed to fit a pair of heels (just about!) in the central pocket, along with my keys and some makeup. In the side pockets: my organiser, a Kindle, a notepad, a wallet, some Jelly Babies (as you do) my iPhone and some sunglasses, though I had to slip the sunglasses into a little fabric sleeve rather than carry the bulky case.
In short, I managed to squash in just about everything I’d carry in a larger bag, I just had to be a bit more disciplined about how I packed it all up.

So yes: a brilliant bag for pretty much anyone, whether you’re jet-setting back and forth to transatlantic business meetings or popping down the road for a quick lunch. I’m about to test it out as a baby-changing bag and add another use to its list – I’ll let you know how many nappies and wipes I can fit in! If I can find an ultra-thin changing mat that folds down into one of the outer pockets then I’ll be a very happy lady indeed…
L.K.Bennett Pearl Nappa Leather Organiser Tote, £395 here.
The post A Handbag for the Organised: The L.K.Bennett Pearl appeared first on A Model Recommends.
First-Night-of-the-Holiday Makeup Look

First night of the holidays, and Mr AMR and I managed to drag ourselves out to dinner despite being absolutely shattered! I decided to do a bit of a sultry eye to compliment my rather glam leopard print dress (Baum und Pferdgarten) and cracked out Charlotte Tilbury’s Vintage Vamp palette, which has a beautiful array of warm, golden and glittery shadows that can be blended together or patted over one another to create the perfect look. (You can find The Vintage Vamp here, if you want to take a look at the shades.) I used the two darkest shadows to smoke around the lower lashline and into the outer corners, pulling the shadow towards the ends of my brows to create a soft, hazy kind of cat-eye look. If you have blue eyes then this palette is a must-have, it really intensifies them. Great for all eye colours, I imagine, but especially blue.

No foundation, as I have been prepping my skin pre-holiday with a gradual tanner – Clarins’ Radiance-Plus Golden Glow Booster, the Don of all face tanners. Just a couple of drops, added to whatever else you’re applying – moisturiser, face oil, serum, I’ve experimented with them all – and you have the most gorgeous, subtle glow the next day. I’m about to go in for a three-days-in-a-row application, so I’ll let you know just how bronzed I get! I barely let my face into the sun, now, when I’m on holiday – it’s thirty-two degrees where I am in Greece and it’s just too hardcore for my skin. Much better to fake it, and this little bottle of Clarins joy is doing an amazing job. It’s actually on offer at the moment, £15.80 at Escentual.com here.

I finished the look with a sweep of bronzer – Guerlain’s Terra Tropica, which you can read all about here. It has a hint of pink, a little fleck of gold, here and there…just perfect for holiday skin. If you want to snap one up before the very end of summer then they still have a few left online here. It’s a pretty special bronzer!
More makeup looks here…
How to Hide Dark Circles Like a Pro
Hi Makeup Geeks!
If you are anything like me, I hardly ever get the 8 hours of recommended sleep (hello coffee and eye concealer!) So to combat my dark circles, I have a 4 step method to hiding them like a pro. You’ll look like you slept like a baby the night before!
Step 1: Conceal
To counteract the blue/gray color under the eyes, you need to use a color opposite on the color wheel which would be orange. If you have fair skin, you’ll want a light to medium peach color. For medium to dark skin, a dark peach or orange color.
I use the Eve Pearl Salmon Concealer and my ring finger to apply a thin coat under the eyes. You need the color of the concealer to be 1-2 shades darker than your skin so it actually hides the dark circles. Apply the concealer low enough under the eyes to completely cover the dark circles (don’t worry about it looking orange, as we will blend it out in the next step)
- Eve Pearl Salmon Concealer – Makeup Geek Store
Step 2: Blend
If you don’t wear foundation, use a concealer the same color as your skin tone and pat on top of the orange concealer you just applied. This will blend the peach/orange concealer into the skin and make it appear more natural. I always use a foundation, for me I use the Estee Lauder Double Wear or the Cover FX foundation. I use the Makeup Geek Foundation Stippling Brush or a Beauty Blender to apply my foundation all over my face. Be careful around the eyes not to swipe off the orange concealer underneath. The goal is just to blend the concealer into the foundation.
- Estee Lauder Double Wear Foundation – (Amazon) (eBay)
- Cover FX Natural Finish Oil-Free Foundation – (Amazon) (Sephora)
- Makeup Geek Foundation Stippling Brush – (Makeup Geek Store)
- Beauty Blender Sponge – (Makeup Geek Store)
Step 3: Brighten
This step is optional, but if you feel you can still see your dark circles, you may want to brighten with a lighter color concealer. All you need is a thin consistency concealer like the Maybelline Fit Me or the Revlon Age Defying. Choose a color that is 1 shade lighter than your skin- this is to brighten under the eyes. Place a couple of dots under your eye and use a soft dome brush to blend softly.
- Maybelline Fit Me Concealer – (Amazon) (eBay)
- Revlon Age Defying Concealer – (Amazon) (eBay)
- Soft Dome Brush – Makeup Geek Store
Step 4: Set
If you have dry skin, you can skip applying face powder and just use a matte eyeshadow 2 shades lighter than your skin. Using the same soft dome brush, apply a thin layer under the eyes just to set the concealer and prevent it from creasing throughout the day. If you need powder all over the face, use a flat thin sponge and apply a thin layer of powder in the T Zone and under the eyes. My favorite powder right now is the Maybelline Dream Matte as it doesn’t get cakey.
- Maybelline Dream Matte Powder – (Amazon) (eBay)
- White Lies Eyeshadow (use the color “Beaches and Cream” if you have medium to dark skin) – Makeup Geek Store
- Soft Dome Brush – Makeup Geek Store
I hope this helps you all with your dark circles! I realize this is a process, but I swear by this method when I need some heavy duty coverage 😉
Much love,
Marlena

Thanks to Makeup G
Stay tuned with Blocosmetics.com: Your favourite makeup blog